
In my last post, I announced my FI research project, which aims to build a tool that can benefit both the FI and broader CUNY community. Specifically, the project focuses on building the FI Events Mobile Application. As a quick reminder, the goals of the project are the following:
- Build an Android Mobile App that displays FI events, which provides greater access to information
- Share the code publicly to enable users to see, use, and build upon the code used, which supports our belief that tools should be open-source
- Post bi-weekly reflections, which will share with users development tips and resources
This post will give some tips on how to get started. Building a mobile app can be an extremely daunting task, especially for someone who has never built an app before. Full disclosure, although I have years of experience writing code, this will be my first mobile app. So, to make it easier for those who follow in the future and to promote open research, here are some tips to make it easier for you. When I first began, something I quickly realized was that there are a lot of things to consider, before you even begin to write the first line of code. First, figure out why i.e. why are you building this application? And second, does something like it already exist? This requires a good deal of research on your part. In my case, the motivation for the app stems from the Futures Initiative events series, The University Worth Fighting For. We organize this series every semester and these events play a large role in building community and promoting institutional change. At FI, we are constantly thinking about new ways to help CUNY students and given the geographic make-up of CUNY and the long commute times for CUNY students, an events app could help provide students access to information regardless of the situation; this defines why. Currently, at CUNY, an events app does not exist, answering the second important question. After determining the motivation behind the app and conducting research to make sure your app will be unique in its purpose, I suggest the next 4 steps:
- Pick an operating system (OS)
- Mockup the app
- Setup an Interactive Developer Environment (IDE)
- Setup a Github account
For step 1, you will need to decide which operating system or systems you would like your app to be available on. For example, will your app be used on iOS or Android, or both? I suggest considering two major questions when you make this decision, (1) what type of devices do most of your (targeted) users have? And, (2) which programming language do you know or do you want to know? Each OS is written in its own language, Java for Android and Swift for iOS. Keep in mind, building an app is a great way to hone your programming skills. So, it is very important to pick the system that will be most relevant to you and your future. If you want to be a software engineer for Google, then writing an Android app is likely the way to go. If all of your users own iPhones then iOS is probably the right choice for you. Make sure to really put some thought into this decision, as it will pretty much affect every other choice you make. I made the choice to write the FI app in Android using Java. I have experience in Java and wanted to use this project as an opportunity to become fully proficient in it.
After picking an OS, I’d suggest creating a mockup of the app. Here’s a mockup of the FI app:
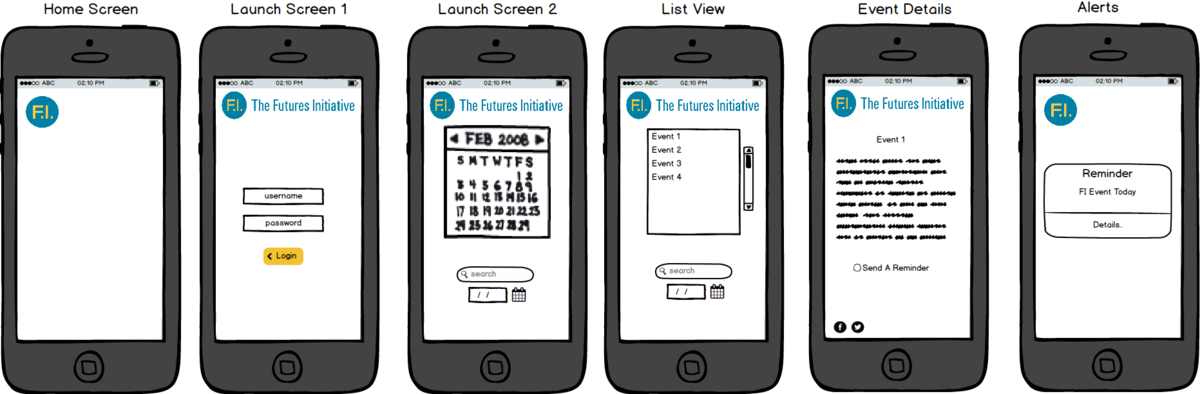
The mockup helps you lay out exactly what the app will look like. It helps you determine what the screens will show and what features the app will offer. It’s also a great way to see how each component of the app will fit together. For this mockup, I used the online tool balsamiq, which is free for certain types of organizations. If you don’t qualify for the free version, you can check out these other online tools: Mockup Builder (2 Week Free Trial) and Frame Box (completely free).
Once you have you have your mockup finalized, I’d suggest downloading an IDE. Again, this will be dependent on the OS you chose. For my case, since I’m working with Android, I downloaded Android Studio, the official IDE for Android. If you are working with iOS, you will want to download Xcode. The IDE provides everything you need to develop the app: an editor, a debugger, and build tools. They also usually have an emulator, so you can test your app virtually on your laptop or device. I’d suggest using the OS’s official IDE that way you have access to their large body of documentation and tutorials.
My last getting started tip is to set up a Github account. Github is a development platform that is great for managing and documenting projects. It’s the perfect platform to document your entire project’s history allowing you to manage any changes you make along the way. It is also a great tool for version control while collaborating, which is especially important if you plan on developing your app with a team. I also think it’s a great way to promote open-source and lets others track your project’s progress. For example, you can check out the FI App’s Github repo to watch our app develop. Both Android Studio and Xcode support Github making it easy to integrate the two platforms. Once you have chosen an OS, created a mockup, and have setup your IDE and Github account, I’d say you’re pretty much ready to start coding! Good luck 🙂